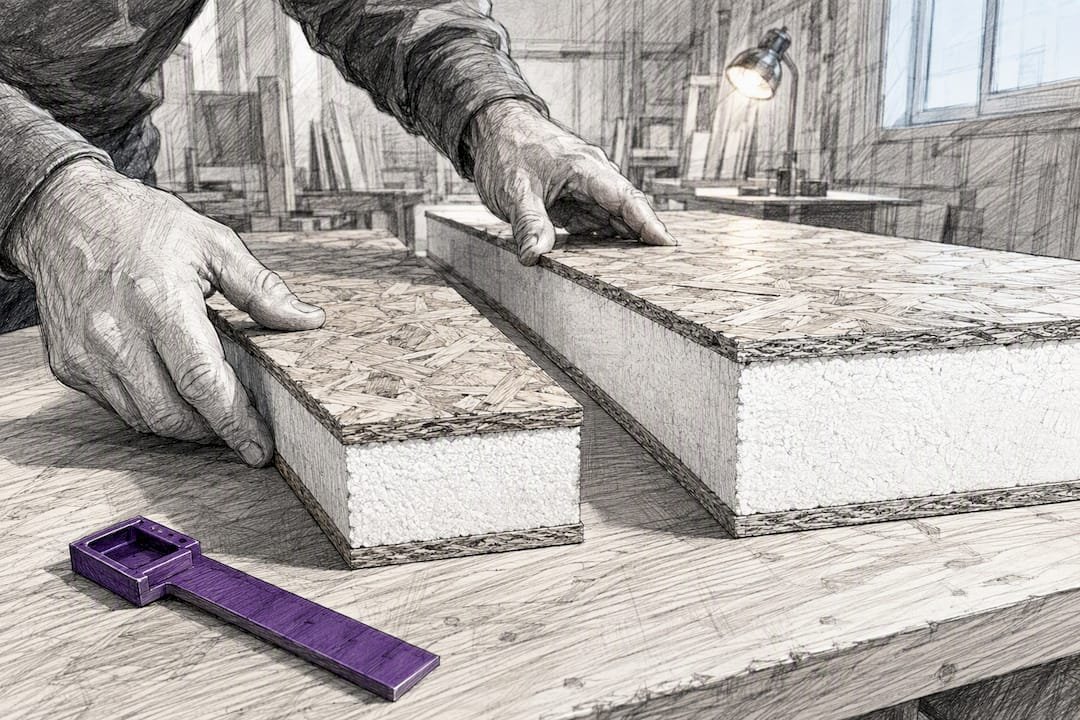
Most SIP walls run nominally 4-1/2 inches (114 mm) or 6-1/2 inches (165 mm) thick, and thicker panels exist for cold climates or long spans. The right pick comes down to two things: structural capacity for your wall height and span, and the whole-wall R-value your climate and energy target demand. Foam type and airtight installation matter just as much as raw thickness.
TL;DR:
- Thicker panels, like 6-1/2 inches, are essential for cold climates and high energy targets, but may require engineer approval if load limits are exceeded.
- Nominal thickness varies with foam core size, with 4-1/2 inch panels having roughly R-14 and 6-1/2 inch panels around R-22 at the core, but real-world performance depends on proper sealing and installation.
- Manufacturing tolerances can affect actual panel thickness, so verify exact specs and structural ratings before ordering to avoid on-site adjustments.
- Thicker panels impact door, window, and service chase details, requiring careful planning and potentially custom jamb extensions for seamless finishes.
- Beyond thermal benefits, upgrading to thicker panels often increases handling risk and cost without proportionate energy gains, making airtightness and sealing more cost-effective priorities.
Table of Contents
- Standard Nominal SIP Wall Thicknesses Explained
- Core R-Value vs. Whole-Wall R-Value: What Actually Matters
- Structural Limits: Span, Load, and When You Need an Engineer
- Choosing Thickness by Climate, Energy Target, and Project Type
- What Thicker Panels Mean for Installation and Detailing
- Cost, Trade-Offs, and When Thicker Isn’t Better
- Durability and Moisture Management Across Thicknesses
- How Wall Thickness Shapes Interior Space and Design
- Why Manufacturing Tolerances Matter More Than You’d Think
- Kit-Based Projects Simplify the Thickness Decision
- Where to Find Verified Panel Specs and Kit Options
- Sources
- FAQ
Standard Nominal SIP Wall Thicknesses Explained
When someone quotes you a “6-1/2 inch panel,” that number describes the finished sandwich, not just the foam. A structural insulated panel is built from two structural facers, usually oriented strand board, bonded to a rigid foam core. The nominal wall thickness is the sum of both facers plus the core, and it’s the figure manufacturers use across their product guides and load tables.
For walls, two sizes dominate the market. Manufacturer sizing documentation like SIP DESIGN BP-4 confirms 4-1/2 inch and 6-1/2 inch panels are the standard wall options, with thicker panels reserved for roofs, floors, and specialized structural needs. Here’s how the common sizes break down:
- 4-1/2 inch (114 mm): The baseline residential wall panel, built around a 3-1/2 inch foam core sandwiched between two facers.
- 6-1/2 inch (165 mm): The go-to choice for colder climates or projects chasing a higher whole-wall R-value, using a 5-1/2 inch core.
- 8-1/4 inch, 10-1/4 inch, and 12-1/4 inch: Less common for walls, but used where floor or roof loads demand it, or where a project specifically targets very high insulation values.
The facer thickness itself is fairly standardized. Most SIP manufacturers use 7/16 inch OSB on each face, which means roughly 7/8 inch of the total nominal thickness is structural sheathing rather than foam. That detail matters more than it sounds. It affects how deep your window and door jamb extensions need to be, and it’s why two panels both labeled “6-1/2 inch” from different plants aren’t always identical down to the millimeter.
Nominal thickness is a rounded, industry-standard label, not a manufacturing guarantee. Panel cores can vary slightly by supplier, and facer thickness sometimes shifts based on the structural grade specified for a given project. Before you finalize window bucks, trim details, or jamb extensions, pull the exact spec sheet from your panel supplier rather than assuming a 6-1/2 inch panel measures exactly 165 mm on every project. That five-minute check saves a lot of on-site improvising later.
Core R-Value vs. Whole-Wall R-Value: What Actually Matters
Thicker foam gives you a higher core R-value, but that number alone doesn’t tell you how the wall performs once it’s built. The core foam in most SIPs is EPS, and it’s commonly rated around R-4 per inch. A 4-1/2 inch panel with a 3-1/2 inch core lands near R-14 to R-15 at the core, and a 6-1/2 inch panel with a 5-1/2 inch core comes in around R-22, based on approximations drawn from SIP material overviews. Treat those as rough guides rather than fixed figures. Foam formulations and manufacturer testing vary, and R-value per inch doesn’t extrapolate perfectly linearly as core thickness grows.
Whole-wall R-value regularly beats core R-value in SIP construction, because SIPs eliminate most of the repeated wood framing that creates thermal bridges in a stick-built wall. Building America’s Solution Center cites a framing factor near 8.7% for SIP assemblies, compared with 15% to 25% in conventional 2x framing. Less wood interrupting the insulation layer means less heat sneaking through stud lines, so the finished wall performs closer to its core R-value than a traditionally framed wall ever does relative to its batt rating.
That gap between core R-value and real-world performance is exactly why comparing SIPs to stick framing on R-value alone undersells them. A stick-framed wall stuffed with R-19 batts might test out lower in whole-wall performance than a 4-1/2 inch SIP wall, purely because of how much framing lumber breaks up the insulation.
So when does it make sense to size up? A few situations reliably call for the thicker 6-1/2 inch panel over the standard 4-1/2 inch option:
- You’re building in a cold climate zone where code minimums or your own energy targets push past what a 114 mm core can deliver.
- You’re targeting net-zero-ready or passive-house-adjacent performance, where every whole-wall R point reduces mechanical system size and operating cost.
- You’re building a year-round conditioned space (not a garden studio used seasonally) where heating and cooling loads run consistently.
- Your local utility or code authority offers meaningful incentives tied to a specific whole-wall R-value threshold.
If none of those apply, and you’re in a mild or mixed climate building a seasonal structure, the standard 4-1/2 inch panel is usually the more sensible default. Airtightness and correct spline sealing at the joints will do more for your actual energy bill than jumping to a thicker core with sloppy installation.
Structural Limits: Span, Load, and When You Need an Engineer
SIP wall thickness isn’t just a thermal decision. It’s a structural one, governed by prescriptive tables that most builders never read closely until a permit reviewer asks for them. The IRC R610 provisions and the industry’s own prescriptive method documentation both work the same way: they let builders use standard 4-1/2 inch or 6-1/2 inch panels without a stamped engineering design, as long as the project stays inside specific limits on wall height, roof span, snow load, and wind exposure.
Step outside those limits and the prescriptive path closes. That’s not a suggestion, it’s the trigger point where an engineer’s signature becomes mandatory rather than optional.
The table below illustrates how thickness, span, and load interact under typical prescriptive guidance. Treat every figure as illustrative. Actual allowable spans depend on your panel manufacturer’s tested data, your local wind and snow load requirements, and the specific code edition your jurisdiction has adopted.
| Panel Thickness | Typical Wall Height Limit | Common Use Case | Design Path |
|---|---|---|---|
| 4-1/2 in (114 mm) | Up to roughly 10 ft under many prescriptive tables | Single-story homes, studios, mild to moderate loads | Prescriptive, if within table limits |
| 6-1/2 in (165 mm) | Higher allowable spans and loads than 4-1/2 in | Two-story homes, higher snow/wind zones, taller walls | Prescriptive, if within table limits |
| 8-1/4 in and thicker | Project-specific | Long roof spans, heavy snow load, unusual geometry | Engineered design required |
A handful of conditions reliably push a project out of prescriptive territory and into engineered-design territory:
- Wall height exceeds roughly 10 feet, which is a common ceiling in many prescriptive tables.
- The roof span exceeds what the manufacturer’s own tested tables allow for that panel thickness.
- The project sits in a high snow-load or high-wind-exposure zone beyond the table’s assumptions.
- You’re stacking a second story’s load path through a first-floor SIP wall.
- The building has irregular geometry, large openings, or point loads that the standard tables never anticipated.
That last category catches more projects than people expect. A wall full of windows, or a wide garage door opening, can invalidate a prescriptive table even when the panel thickness and wall height look fine on paper. When any of these apply, pull your manufacturer’s actual load tables (they’re more precise than any generic prescriptive chart) and loop in a structural engineer before you order panels. It’s a far cheaper conversation before fabrication than after.
Choosing Thickness by Climate, Energy Target, and Project Type
Climate zone is often the single biggest factor separating a 4-1/2 inch project from a 6-1/2 inch one. In mild or mixed climates, a 114 mm SIP wall paired with tight air sealing frequently meets code and comfort expectations without trouble. In cold climates, or on any project chasing a serious energy performance target, 165 mm becomes the more defensible default, and some net-zero-oriented builds push even further.
There are two general compliance routes for meeting energy code, and they change how you think about thickness. The prescriptive route locks you into fixed insulation values by climate zone, which usually points you toward one of the two standard thicknesses with little flexibility. The performance/modeling route lets an energy model trade off elsewhere in the building (better windows, tighter ducts, a higher-efficiency heat pump) to offset a thinner wall. If your project is being modeled rather than checked against a prescriptive table, thickness becomes one variable among several rather than the only lever you can pull.
A few practical rules of thumb:
- Seasonal, unconditioned, or lightly conditioned spaces (a garden studio, a hobby shed) rarely justify the cost jump to 165 mm.
- Year-round living or working spaces in anything colder than a mild climate zone usually justify it.
- Retrofits and additions attached to an existing structure often do better matching the new wall’s effective performance to the old one, rather than maximizing thickness in isolation.
- New builds with a clean slate have more freedom to standardize on one thickness across the whole envelope, simplifying framing details at corners and openings.
Pro Tip: Before you spend the extra money moving from 4-1/2 inch to 6-1/2 inch panels, get a blower-door test scheduled for your build (or ask your panel supplier about their spline sealing system). A thicker wall with poor spline sealing can underperform a thinner wall that’s properly taped and sealed at every joint. Airtightness is the cheaper lever, and it’s the one most crews get wrong first.
What Thicker Panels Mean for Installation and Detailing
Wall thickness ripples into nearly every detail decision on a SIP project, starting with the openings; for example, how new interior doors improve energy efficiency in older Portland homes highlights why jamb sizing and finish details matter when panel thickness changes. Standard door and window jambs are sized for conventional 2×4 or 2×6 wall depths, and a 6-1/2 inch SIP wall almost always needs extension jambs to bring trim flush with the finished interior and exterior surfaces. Skip that step and you’ll be improvising jamb extensions on site, which is exactly the kind of thing that eats a Saturday.
- Confirm jamb depth before ordering doors and windows. A 4-1/2 inch wall needs different extension jambs than a 6-1/2 inch wall, and ordering the wrong depth means delays waiting on custom trim.
- Plan panel handling before delivery day. Larger panels, sometimes up to 8 feet by 24 feet according to Structure Magazine’s overview of SIP construction, can weigh enough that a crew of two or three can’t safely set them by hand. Know your crane or forklift needs before the truck shows up.
- Map your service chases early. Thicker panels change how electrical and plumbing runs get routed, since chases are typically cut into the foam core rather than run through open stud bays.
- Get spline connections right the first time. Improperly sealed splines are one of the most common sources of air leakage and callback issues on SIP jobs, and the fix gets harder once drywall is up. A proper connection guide is worth reading before your first panel goes up, not after.
- Watch for gap-filling shortcuts. Foam sealant is not a substitute for correctly sized panels and tight spline fits. Crews under time pressure sometimes fill gaps rather than fix them, and that habit shows up later as drafts and moisture entry points.
If you want the fuller walkthrough on setting panels correctly, a step-by-step installation guide covers the sequencing most crews get wrong on their first SIP project.
Cost, Trade-Offs, and When Thicker Isn’t Better
Panel thickness is one of several line items driving SIP project cost, and it’s rarely the biggest one. Foam type (EPS versus higher-performance cores), custom cutting for non-standard openings, shipping distance and handling requirements, and the need for engineered splines on larger spans all add up faster than the jump from 4-1/2 inch to 6-1/2 inch foam alone.
That’s where diminishing returns show up. Moving from a 4-1/2 inch to a 6-1/2 inch panel buys you real R-value gain, but moving further, to 8-1/4 inch or beyond, for a standard residential wall often adds cost and handling complexity without a proportional energy payoff. At some point, the smarter move for a marginal insulation boost isn’t a thicker panel. It’s better air sealing, upgraded window performance, or exterior continuous insulation added over a standard-thickness wall.
A few scenarios where upsizing thickness is probably the wrong call:
- You’re already meeting your energy target with 4-1/2 inch panels and tight detailing, and the only reason to go thicker is “more is safer.”
- Your project has tight site access or handling constraints where larger, heavier panels create real logistical problems.
- Your budget is better spent on windows, mechanical systems, or airtightness testing than on foam core depth.
Pro Tip: If you’re on the fence between thicknesses purely for thermal performance, price out doubling up a 4-1/2 inch wall assembly with a layer of exterior continuous insulation instead. It sometimes lands cheaper than jumping straight to a thicker panel, while giving you similar or better whole-wall performance. For a full breakdown of what drives project costs, the cost-per-square-foot guide walks through the numbers in more detail.
Durability and Moisture Management Across Thicknesses
Thickness itself doesn’t determine how well a SIP wall handles moisture over the decades it’s expected to last. Detailing does. A thicker panel with poor flashing at window heads or a missing weather-resistive barrier will trap moisture just as readily as a thinner one, and once moisture gets into an OSB facer, the consequences show up as delamination or facer rot rather than a gradual, easy-to-catch problem.
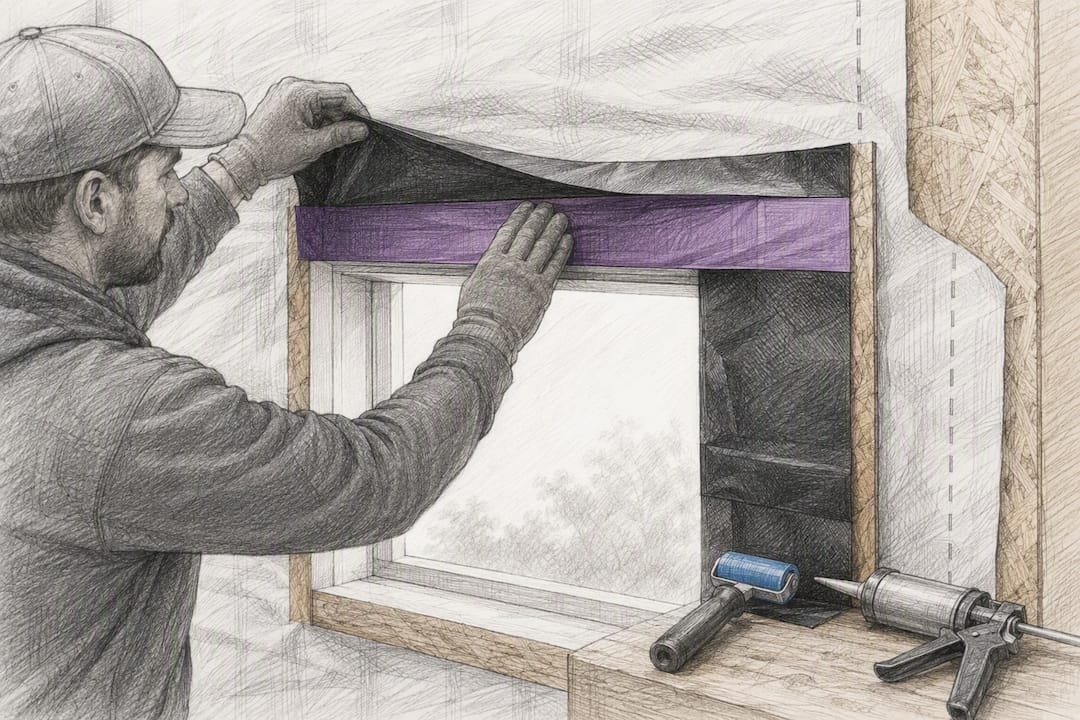
The core risk with any SIP wall, regardless of nominal thickness, is vapor getting trapped between the facers with no way to dry out. That’s why correct flashing details, a continuous weather barrier, and properly sealed spline joints matter more to long-term durability than whether you chose 114 mm or 165 mm. Thicker cores don’t inherently resist moisture better. What changes with thickness is the depth of foam separating the two facers, which can slightly affect how quickly incidental moisture dries if it does get in, but that’s a secondary factor compared to getting the water management details right at the design stage.
Roof-to-wall transitions and below-grade connections deserve particular attention on any thickness. These are the spots where a small flashing mistake compounds over years of freeze-thaw cycles or wind-driven rain into a genuinely expensive repair. If you’re specifying a thicker wall specifically for energy performance, don’t let that upgrade distract from getting the basic moisture details right everywhere else on the building envelope.
How Wall Thickness Shapes Interior Space and Design
Every inch of wall thickness is an inch you’re not living in. On a modest structure like a 12 by 16 foot backyard studio, the difference between 4-1/2 inch and 6-1/2 inch walls on all four sides adds up to a noticeable chunk of lost interior square footage, particularly on smaller footprints where every foot counts toward usable space.
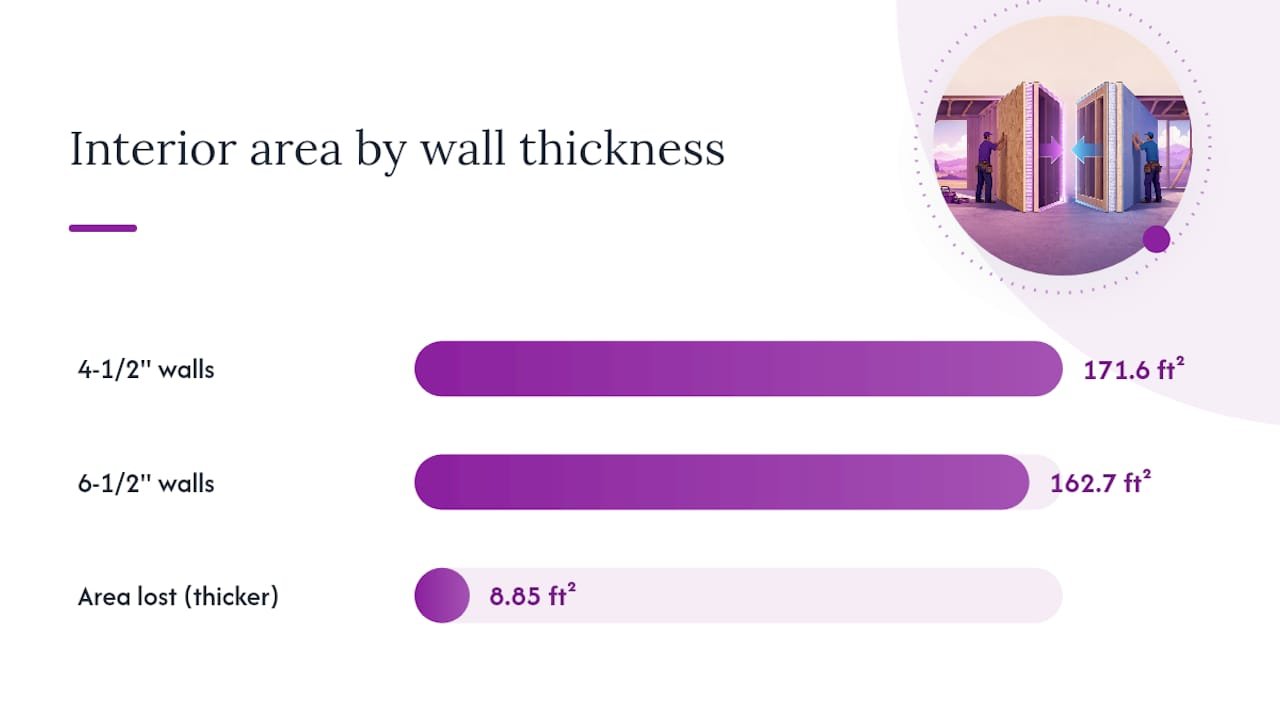
That trade-off matters most on compact builds: home offices, garden studios, small accessory dwelling units, where the exterior footprint is often fixed by lot setbacks or budget, and interior square footage is the whole point of the project. On larger homes, the same thickness difference barely registers as a percentage of total floor area.
Thickness also affects architectural details beyond square footage. Deeper walls mean deeper window returns, which changes how daylight rakes across an interior sill, and it changes how much depth you have available for built-in shelving or recessed fixtures at exterior walls. Designers working with thicker panels sometimes lean into that depth deliberately, using deep-set windows as a design feature rather than treating them as a constraint to hide.
Why Manufacturing Tolerances Matter More Than You’d Think
Nominal thickness assumes a level of precision that real manufacturing doesn’t always deliver perfectly. Foam core thickness can vary slightly batch to batch depending on the pressing process, and facer thickness can shift based on the OSB grade a mill has in stock that week. Reputable manufacturers control for this with quality certification and grade marks stamped on every panel, which is exactly what you should be checking for before you accept a delivery.
Ask your supplier for their tolerance specification in writing, not just a verbal assurance. A panel that’s supposed to be 6-1/2 inches but consistently runs an eighth of an inch thin across a shipment will throw off your jamb extension measurements at every single opening, turning a minor manufacturing variance into a framing crew’s afternoon-long headache. Tight tolerances also matter for structural performance, since load tables assume a specific core thickness contributing to overall panel strength. A panel that’s meaningfully undersized isn’t just a cosmetic issue, it’s a structural one.
Kit-Based Projects Simplify the Thickness Decision
Standardizing on one or two panel thicknesses across a kit removes most of the guesswork that trips up custom-cut jobs. When every wall panel in a kit uses the same nominal thickness, jamb sizing, service chase planning, and trim details all get worked out once and repeated, rather than re-solved wall by wall.
For a backyard office or small modular structure, that usually means a 4-1/2 inch panel: thick enough for solid year-round comfort in most climates, light enough for a small crew to handle without a crane, and priced to make sense for a compact footprint. Reducing decisions to one dimension standard is exactly the kind of prefab construction advantage that turns a multi-week framing job into a multi-day assembly.
— Kian
Where to Find Verified Panel Specs and Kit Options
Reading load tables and prescriptive charts is one thing. Getting a panel that actually matches the spec sheet is another, and that’s the gap Prefabmodularhome’s kits are built to close: verified nominal thickness, facer specs, and structural grade marks on every panel, so you’re not reverse-engineering someone else’s manufacturing tolerance on site.
If you’re weighing a small structure like a backyard office, start with the modular backyard office kit page to see how standardized thickness plays out on a real footprint. Before ordering anything, check three things on the spec sheet: the exact nominal thickness (not just “4-1/2 inch” rounded), the facer material and thickness, and any certification or grade mark backing the structural claims. The full panel product catalog lists these details by SKU, and if your project needs something outside a standard kit, reach out for a project quote so the thickness gets matched to your span and climate needs before panels go into production, not after.
Sources
For thermal modeling questions, the Building America Solution Center’s SIP guidance covers framing factor and whole-wall performance data. For prescriptive design limits, consult IRC R610 directly or the industry’s prescriptive method course material. For general SIP benefits and terminology, SIPA’s overview is the standard industry reference. For actual load capacities on a specific project, always default to your manufacturer’s own tested tables over any generic chart.
FAQ
What Is the Thickest SIP Panel Available?
Walls typically top out around 6-1/2 inches (165 mm) for standard prescriptive use, but panels manufactured for floors and roofs can run up to 12-1/4 inches or more, and some suppliers produce panels up to 8 feet by 24 feet in overall size.
Are SIPs Cheaper Than Stick Framing?
It depends on how you measure it. Material and thickness costs can run higher upfront than conventional framing, but faster assembly, less on-site labor, and lower energy bills from reduced thermal bridging often narrow or close that gap over the life of the project.
Do SIP Panels Need a Vapor Barrier?
Requirements vary by climate zone and local code, but proper flashing, a continuous weather-resistive barrier, and sealed spline joints matter more to moisture control than thickness alone, regardless of whether a separate vapor barrier is required in your jurisdiction.
What Are the Disadvantages of SIP Panels?
The main trade-offs are reduced design flexibility for irregular layouts, the need for engineered design once you exceed prescriptive limits, larger panels requiring crane handling, and less interior space on compact builds if you size up to thicker walls.
Should I Choose 4-1/2 Inch or 6-1/2 Inch Panels for My Project?
Choose 4-1/2 inch for mild climates, seasonal structures, and standard single-story spans within prescriptive limits; choose 6-1/2 inch for cold climates, year-round conditioned spaces, or when your energy target demands a higher whole-wall R-value.