
A SIP spline is the structural connector inserted into the routed groove between two adjacent structural insulated panels. It does two things simultaneously: transfers load across the joint and creates a continuous seam that can be sealed airtight. Get the spline choice wrong and you either sacrifice structural capacity or punch a thermal bridge straight through your envelope.
The short answer for most builders: use a foam block or Type S spline for interior joins and non-load boundary walls where thermal continuity matters most. Step up to a dimensional lumber spline, Type L, or engineered I-joist spline when the joint carries transverse loads, sits at a shear boundary, or spans a long roof run.
- Thermal priority (interior walls, non-load partitions): foam block spline, surface spline, or Premier SIPS Type S
- Structural priority (boundary walls, roof ridges, long spans): 2×6 lumber spline, Premier SIPS Type L, or engineered I-joist spline
- Middle ground: Premier SIPS Type I, where standard splines are marginal but a full Type L is more than the design requires
Buying basics: splines typically run $2–$8 per linear foot depending on material and cross-section, though engineered options cost more. Panel suppliers (DirectSIPs, Premier SIPS), specialty fastener vendors, and prefab kit suppliers like Prefabmodularhome all carry compatible options. Before ordering, confirm panel thickness, groove depth, and whether splines are factory-installed or field-cut.
Pro Tip: Always request the manufacturer’s spline compatibility chart alongside your panel order. A spline that’s 1/8 inch too narrow for the groove leaves a gap that no amount of sealant will reliably close.
Key Takeaways
Spline type is the single most consequential decision in a SIP assembly: it determines structural capacity, thermal performance, and how reliably the joint can be sealed airtight.
| Point | Details |
|---|---|
| Match spline to design priority | Use foam block or Type S for thermal continuity; use Type L or lumber for structural loads. |
| Verify dimensional compatibility | Confirm groove depth and width match spline cross-section before ordering. |
| Follow fastener specs precisely | Use SIPTP, SIPLD, or SIPHD fasteners at the penetration depth the TruFast guide specifies. |
| Seal every joint on both faces | Apply sealant on interior and exterior faces; one-sided sealing is a documented failure point. |
| Prefabmodularhome simplifies sourcing | Factory-cut groove options and kit documentation remove the guesswork from spline selection and ordering. |
Table of Contents
- What are the main SIP spline types and what does each one do?
- Materials, cross-sections, and matching splines to panel thickness
- How to install SIP splines step by step
- How does spline choice affect air sealing and thermal performance?
- How to choose and where to buy SIP splines
- Recommended fasteners and hardware for SIP spline joints
- Common spline mistakes and how to fix them
- How splines work in a DIY prefab SIP kit build
- When should a DIYer handle splines versus calling a pro?
- Prefabmodularhome makes spline selection straightforward
- The case for simpler splines (an editor’s perspective)
- Sources
What are the main SIP spline types and what does each one do?
The SIPA BEST-2 design standard classifies splines into several distinct families, each matched to a different structural and thermal role. Understanding the taxonomy before you order saves costly field corrections.
Surface splines and block splines
A surface spline is a flat strip of OSB or plywood that laps across the panel faces on both sides of the joint. It adds shear continuity without penetrating deep into the core. A block spline is a rectangular piece of foam (usually EPS or PU) cut to fill the routed groove entirely. Both types preserve thermal continuity across the joint because neither introduces a solid wood path through the insulation layer.
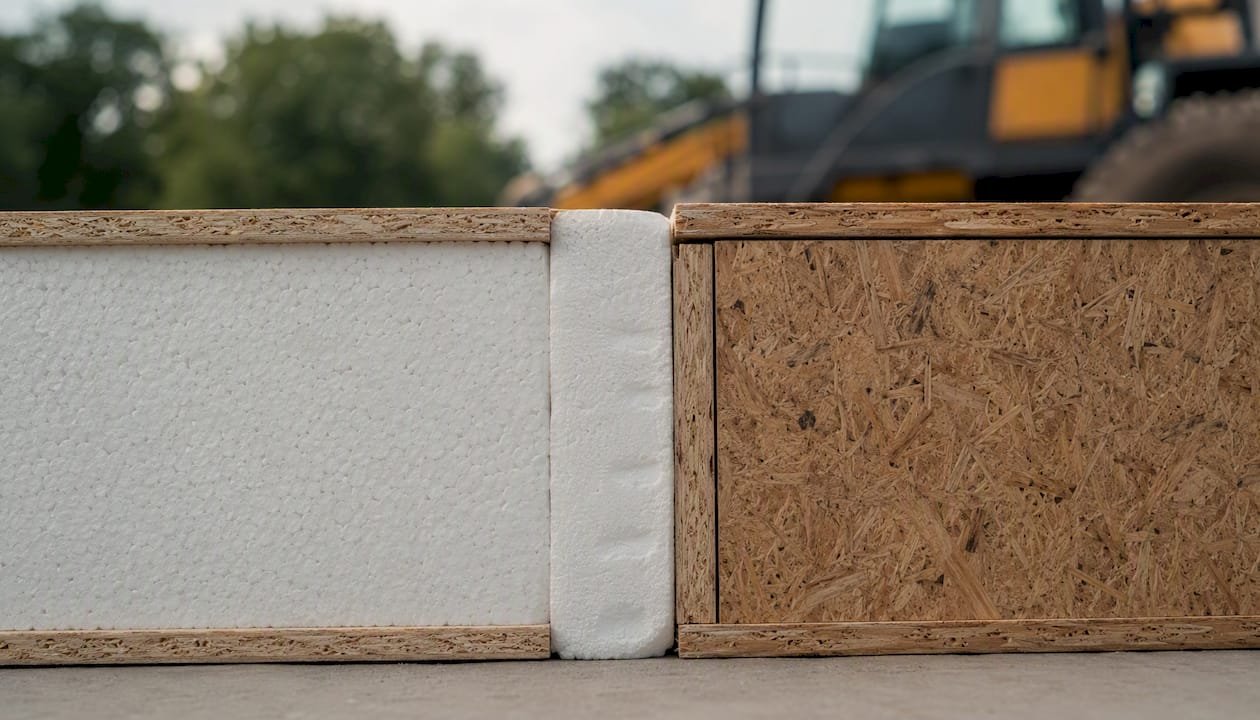
Block splines are the go-to for interior non-load walls and for any join where the design priority is keeping the R-value intact. Surface splines suit thinner panels and lighter-duty joins.
Dimensional lumber splines: single, double, and 2×6 L-splines
A single or double dimensional lumber spline (typically 2×4 or 2×6 pine or LVL) drops into the routed groove and provides genuine transverse load resistance. The 2×6 L-spline is a site-installed variant shaped to lap one panel face, giving an L-profile that resists racking. These are strong and readily available at any lumber yard, but every one of them creates a thermal bridge. Uninsulated lumber running full-height through a wall assembly can meaningfully reduce the effective R-value of the panel system, so they need careful detailing: a continuous layer of exterior rigid insulation or a thermal-break tape at minimum.
Type R, Type RT, Type S, and Type L (per industry classification)
The SIP Engineering Design Guide formalizes four engineered spline designations:
- Type S (SIP spline): not intended to add significant structural stiffness; used where thermal continuity is the design driver. Premier SIPS Type S fits this role.
- Type R (reinforcing spline): adds structural stiffness and load capacity beyond a Type S; used at boundary conditions with moderate loads.
- Type RT (transverse reinforcing): specifically engineered for transverse load resistance, common at roof-to-wall connections and long-span roof panels.
- Type L (high-capacity L-spline): the heavy-duty option. Premier SIPS Type L is specified when design loads exceed what a Type R or Type S can handle. Premier SIPS Type I sits between Type S and Type L for intermediate load conditions.
Pro Tip: For roof panels, always check whether the spline type is rated for the transverse (perpendicular-to-span) loads your design imposes. A wall-rated spline installed in a roof join is one of the most common specification errors in SIP construction.
| Spline type | Best for | Thermal bridging | Structural capacity |
|---|---|---|---|
| Foam block / Type S | Interior walls, thermal-priority joins | None | Low |
| Surface spline (OSB) | Light-duty joins, thin panels | Minimal | Low–moderate |
| 2×6 lumber / L-spline | Field repairs, exterior walls | High | Moderate–high |
| Type R / Type RT | Boundary walls, roof spans | Moderate | High |
| Type L (Premier SIPS) | High-load boundary conditions | Moderate | Very high |
| Type I (Premier SIPS) | Intermediate load conditions | Moderate | Moderate–high |
| Engineered I-joist | Long-span roofs, heavy loads | Moderate | Very high |
Materials, cross-sections, and matching splines to panel thickness
Common spline materials span a wide range: OSB or plywood faces, EPS or PU foam blocks, dimensional pine or LVL, engineered I-joists, and cold-formed steel channels for commercial applications. The material choice drives both the structural and thermal outcome.
Spline width must match the panel groove. The SIP Engineering Design Guide notes minimum spline widths for interior and boundary conditions. As a practical rule, the spline should fill the groove snugly without forcing the panels apart. For a 4.5-inch core panel (a common 6.5-inch overall thickness), a 3.5-inch-wide lumber spline is typical. For a 6.5-inch core panel, a 5.5-inch spline is standard.
Cold-formed steel channels appear in commercial SIP assemblies where fire ratings or point loads demand it. They require a thermal break between the steel and the panel face to avoid condensation.
Before ordering, verify these on the panel drawing:
- Groove depth and width (factory-routed vs. field-cut)
- Spline material specified by the engineer or panel supplier
- Fastener schedule (spacing, length, coating)
- Whether the spline is factory-installed or shipped loose for field insertion
- Any required adhesive or sealant bead locations
How to install SIP splines step by step
The canonical sequence: lay out panels → verify groove alignment → dry-fit → apply adhesive and sealant → insert spline → fasten per schedule → brace temporarily → seal exterior seam.
- Mark and orient panels. Lay panels flat or stand them in sequence. Confirm the factory label or arrow indicating the top face and structural direction. Misoriented panels create groove mismatches that are expensive to correct once adhesive is applied.
- Check groove alignment. Before any adhesive, dry-fit two adjacent panels with the spline in place. The spline should slide in with hand pressure; if it binds, check for foam burrs or debris in the groove and clear them.
- Apply adhesive and sealant. Run a continuous bead of SIP-compatible adhesive (typically a one-component polyurethane construction adhesive) along the groove walls. Apply a separate bead of low-expansion closed-cell spray foam or approved sealant at the interior and exterior panel face edges. This is the air-sealing moment — gaps here become air leaks later.
- Insert the spline. Slide or press the spline into the groove while the adhesive is still open. For long panels, work from one end to avoid trapping air pockets. Foam block splines compress slightly; dimensional lumber splines should fit without forcing.
- Fasten per the schedule. Drive SIP-rated fasteners through the panel face into the spline at the spacing your engineer or panel supplier specifies. Per the TruFast SIP Fastener Installation Guide, screws should penetrate the framing roughly 1 inch beyond the combined thickness of the assembly components. Never substitute drywall screws or standard wood screws — they lack the shear capacity and head geometry for SIP loads.
- Brace temporarily. For wall panels, brace plumb before the adhesive sets. For roof panels assembled on the ground, confirm the spline is fully seated before the lift.
- Seal the exterior seam. Apply a compatible tape or additional sealant bead over the exterior joint per the PNNL/BASC air-sealing guidance. This second line of defense matters most at roof-to-wall transitions.
Tools and materials checklist:
- SIP-rated fasteners (correct family and length for panel thickness)
- Cordless impact driver with T-30 bit
- One-component polyurethane construction adhesive and caulk gun
- Low-expansion closed-cell spray foam
- Seam tape (foil-faced or butyl, per manufacturer spec)
- Chalk line and speed square
- Temporary bracing lumber and clamps
- Safety glasses and gloves
Pro Tip: When assembling multiple roof panels in sequence, fasten and seal each spline joint before moving to the next panel. Trying to insert and fasten three panels simultaneously creates alignment drift that compounds across the run.
How does spline choice affect air sealing and thermal performance?
Spline selection and sealing quality together determine whether a SIP assembly actually delivers the airtightness and thermal continuity the panel system promises. A well-chosen panel with a poorly sealed spline joint underperforms a conventional framed wall.
PNNL/BASC guidance is direct: sealing at spline connections is critical, and seam details must show exactly where sealant is required to achieve an airtight joint. Improper sealing at splines is a documented cause of moisture intrusion, mold, and measurable energy loss.
The DOE Zero Energy Ready Home program frames whole-building thermal enclosure as a system-level requirement, not a panel-level one. Spline joints are among the highest-risk locations in that system.
Thermal bridging tradeoffs by spline type:
- Foam block / Type S: no thermal bridge; the foam fills the groove and maintains R-value continuity. Best choice when energy performance is the primary specification driver.
- OSB surface spline: minimal bridging; OSB has low conductivity compared to lumber, but the lapped faces create a thin conductive path.
- Dimensional lumber (2×4, 2×6, L-spline): significant thermal bridge. A full-height 2×6 through a wall panel can reduce the assembly’s effective R-value noticeably, particularly in cold climates.
- Engineered I-joist spline: lower bridging than solid lumber because the web is thinner, but the flanges still conduct. A thermal-break layer at the exterior face helps.
Practical mitigation methods:
- Specify foam block or Type S splines wherever structural loads permit
- Add a continuous layer of rigid exterior insulation (minimum 1 inch) over lumber-splined walls to interrupt the bridge
- Apply butyl or foil-faced tape over every spline seam on the warm-side face before interior finishes
- Use low-expansion closed-cell spray foam at the groove edges rather than open-cell or backer rod alone
Pro Tip: The ENERGY STAR Thermal Enclosure System Rater Checklist includes specific line items for SIP seam verification. Running through it before closing up walls catches missed sealant beads before they become blower-door failures.
How to choose and where to buy SIP splines
Prioritize spline type based on one question: is structural capacity or thermal continuity the primary design driver for this joint? Answer that first, then match the product.
| Product | Best for | Material | Thermal bridging | Structural capacity | Ease of install |
|---|---|---|---|---|---|
| Prefabmodularhome panel kits | DIY kit builders, factory-fit panels | PU/EPS foam core, OSB faces | Low (foam block options) | Moderate (kit-specified) | High — factory grooves |
| DirectSIPs | Panel + spline sourcing | OSB-faced panels, accessory splines | Varies by spline type | Moderate–high | Moderate |
| Timber splines (Formance / generic) | Boundary walls, point loads | Dimensional lumber / LVL | High | High | Moderate |
| Premier SIPS Type L | High-load boundary conditions | Engineered lumber | Moderate | Very high | Pro recommended |
| Premier SIPS Type S | Thermal-priority joins | Foam / OSB | Low | Low | High |
| Premier SIPS Type I | Intermediate load conditions | Engineered | Moderate | Moderate–high | Moderate |
| 2×6 lumber spline / L-spline | Field repairs, simple exterior walls | Dimensional lumber | High | Moderate–high | High — familiar material |
Before placing an order, confirm:
- Spline dimensions match your panel groove (depth and width)
- Whether splines are factory-installed or shipped loose
- Recommended fastener type, length, and spacing for your panel thickness
- Lead time (engineered splines often have longer lead times than lumber)
- Whether the supplier provides installation diagrams and spec sheets
Pro Tip: Ask your panel supplier for the spline compatibility matrix before finalizing your order. Some panel thicknesses accept multiple spline types; others are engineered for one specific cross-section. Substituting in the field without checking voids most panel warranties.
Recommended fasteners and hardware for SIP spline joints
Use SIP-rated fasteners sized so the thread length and overall penetration follow manufacturer guidelines. The TruFast installation guide specifies that screws should penetrate the framing roughly 1 inch beyond the combined assembly thickness. That rule applies whether you’re fastening into a lumber spline, an I-joist flange, or a steel channel.
TruFast’s SIP fastener line covers three families:
- SIPTP: designed for wood substrates; pancake head, T-30 drive; the standard choice for lumber and OSB splines
- SIPLD: for light-gauge steel (corrugated deck or light steel framing); same head geometry, different point and thread profile
- SIPHD: for thick steel substrates in commercial applications
Coating matters in aggressive environments. HCR (high-corrosion-resistance) coating or epoxy e-coat is worth specifying for coastal builds, metal-deck assemblies, or any application where the fastener contacts dissimilar metals. Standard zinc-plated fasteners corrode faster in salt-air environments, and a corroded fastener in a SIP joint is difficult to inspect and nearly impossible to replace without panel damage.
Common spline mistakes and how to fix them
Most frequent assembly errors:
- Gap in spline seating: the spline doesn’t fully bottom out in the groove, leaving a void. Fix: remove the panel, clear debris, reapply adhesive, and re-seat. Prevention: dry-fit every joint before adhesive.
- Insufficient fastener penetration: screws too short to reach 1 inch past the assembly thickness. Fix: add longer fasteners at the same spacing. Prevention: calculate required length before ordering.
- Unsealed lumber spline faces: the thermal bridge is left exposed on the interior face. Fix: apply foil-faced tape or spray foam before closing with drywall. Prevention: include sealing in the fastener-schedule step, not as an afterthought.
- Misaligned grooves: panels assembled out of sequence so grooves don’t line up. Fix: reorder panels per the manufacturer’s layout drawing. Prevention: mark panel sequence numbers on the subfloor before lifting.
- Wrong adhesive: using standard construction adhesive that isn’t compatible with EPS foam. The solvent in some adhesives dissolves foam cores. Prevention: confirm adhesive compatibility with the panel supplier before purchase.
| Symptom | Likely cause | Corrective action |
|---|---|---|
| Air leak at panel joint | Unsealed or gapped spline seam | Inject low-expansion foam from interior; tape exterior seam |
| Panel joint feels soft or springy | Spline not fully seated or wrong size | Remove, re-seat with correct spline and adhesive |
| Condensation at interior joint | Thermal bridge from lumber spline | Add interior vapor-control tape; add exterior rigid insulation |
| Fastener pulls through panel face | Screw too short or wrong family | Replace with longer SIPTP fastener at correct penetration depth |
| Visible gap between panels | Groove misalignment or debris | Disassemble, clear groove, realign per layout drawing |
Pro Tip: Moisture failures at spline joints almost always trace back to two oversights: no capillary break between the spline and the panel face, and sealant applied only on one side of the joint. Seal both faces, every time.
How splines work in a DIY prefab SIP kit build
In a typical backyard office or studio kit build, the spline approach is simpler than a full residential project, but the same principles apply. Most kit panels in this size range use foam block splines or factory-installed surface splines because the structural loads are modest and thermal performance is the primary goal for a conditioned workspace.
The practical workflow for a kit builder:
- Panels arrive with factory-routed grooves; splines are either pre-inserted or shipped loose in the kit
- The installer dry-fits the first two panels, checks groove alignment, then applies the supplied adhesive and sealant per the kit guide
- Fasteners are pre-specified in the kit documentation, eliminating the need to calculate penetration depth independently
- Exterior seams are taped with the supplied foil tape before any cladding goes on
Factory-cut grooves are the single biggest time-saver in a DIY kit build. Field-routing a groove requires a router, a straight edge, and a steady hand; a miscut groove that’s even slightly off-center weakens the joint and creates an air-sealing problem. Ordering panels with factory-cut grooves eliminates that risk entirely.
Pro Tip: When ordering a kit, specify your intended spline type in the inquiry. Prefabmodularhome’s sandwich panel kits include factory groove options and compatibility guidance, so you’re not guessing in the field.
When should a DIYer handle splines versus calling a pro?
DIYers can confidently handle Type S, foam block, and surface splines for non-load boundary walls and interior joins. The fastening is straightforward, the materials are forgiving, and the sealing steps are well within the skill set of anyone who has done basic construction work. The assembly guide at Prefabmodularhome walks through the full sequence for kit builders.
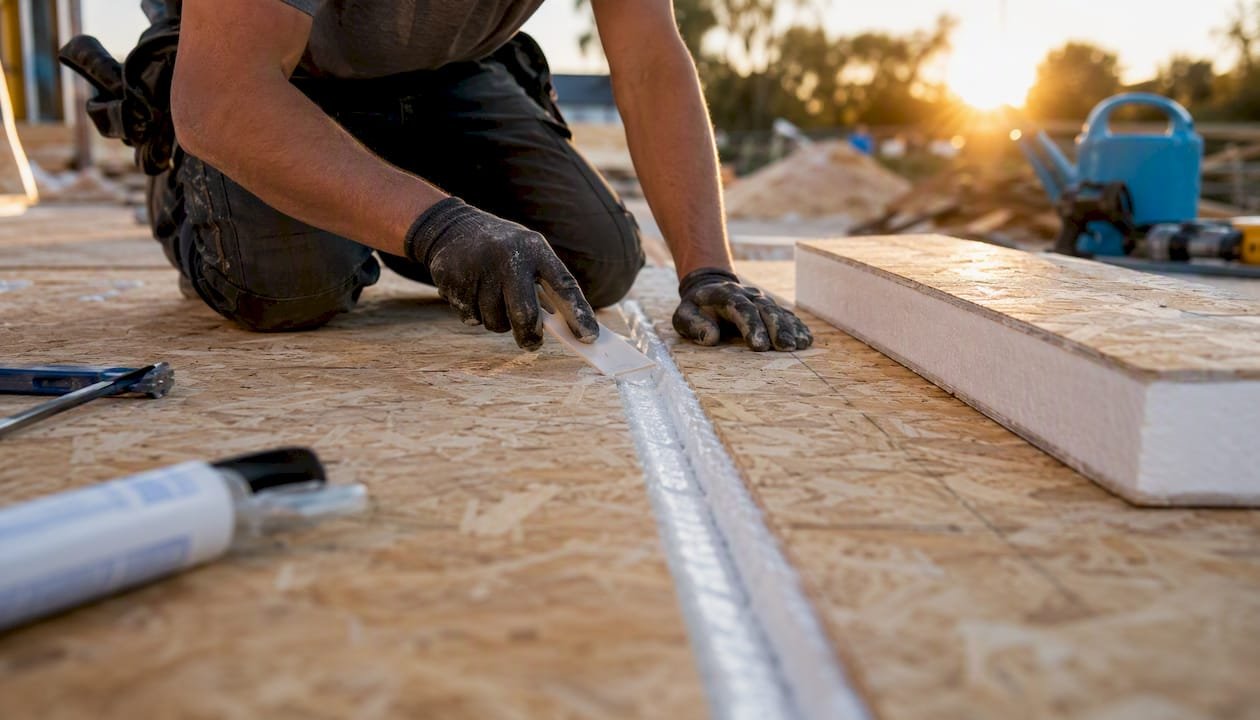
The line shifts when the joint carries significant structural load.
DIY-friendly spline work:
- Foam block and Type S splines in non-load walls
- Surface splines on thin panels with light-duty joins
- 2×6 lumber splines in simple exterior walls where an engineer has already specified them
Bring in a pro or engineer when:
- The joint sits at a shear boundary or load-bearing wall
- Roof panels span more than 16 feet or carry point loads from beams above
- The design calls for Type R, Type RT, or Type L splines (these require engineered fastener schedules)
- Local building codes require stamped drawings for the spline connection
When requesting engineered spline design from a panel supplier, ask for: the spline classification (Type S/R/RT/L), the fastener schedule (spacing, length, family), the required adhesive spec, and the allowable load table for the spline in your panel thickness. That documentation is what a building inspector will ask for, and it’s what protects you if a joint is ever questioned.
Prefabmodularhome makes spline selection straightforward
Choosing the right spline gets complicated fast when you’re sourcing panels and splines separately from different suppliers. Prefabmodularhome’s prefab panel kits sidestep that problem: panels arrive with factory-cut grooves, compatible spline options are documented in the kit spec sheet, and the ordering process includes a compatibility check so you’re not guessing about groove depth or spline width.

For a backyard office or studio build, the kit includes everything needed to complete the spline joints without special tools or engineering experience. Panels, adhesive guidance, fastener specs, and sealing instructions come as a package. If you’re ready to order or want to confirm which spline type suits your panel thickness and use case, reach out through the products page with your panel thickness, intended spline type, and project location.
The case for simpler splines (an editor’s perspective)
The SIP industry’s spline classification system is genuinely useful, but it creates a trap for builders who read the full taxonomy and then over-specify. Type L splines and engineered I-joist splines exist for real engineering reasons, but most residential SIP projects, and nearly all backyard studio or office builds, never come close to the load conditions that justify them.
The more common failure mode isn’t under-engineering the spline. It’s over-engineering the structural connection while under-engineering the sealing. A builder who specifies a Type L spline and then skips the interior sealant bead has a structurally sound joint that leaks air. A builder who uses a foam block spline and seals both faces meticulously has a joint that performs exactly as the panel system was designed to perform.
The practical takeaway: spend less time debating spline classification for non-load walls and more time on the sealing sequence. For load-bearing boundaries and roof spans, yes, get the engineer involved and follow the fastener schedule to the letter. But for the majority of joints in a typical SIP build, a correctly seated, correctly sealed foam block spline outperforms a lumber spline that was installed fast and sealed poorly. The spline you can install correctly matters more than the spline that looks impressive on a spec sheet.
Sources
The sources below are the authoritative references for SIP spline specification, installation, and energy performance. Download the datasheets and installation guides before finalizing any spline specification.
- SIPA BEST-2: Basic SIP Design and Engineering
- TruFast SIP Fastener Installation Guide (Sika-hosted PDF)
- Air Sealing Structural Insulated Panel (SIP) Seams – BASC/PNNL
- DOE Zero Energy Ready Home (ZERH) program requirements
Recommended
- Structural Insulated Panels (SIPs): Your Comprehensive Guide – Modular Homes with Structural Insulated Sandwich Panels
- Modern Construction with Structural Insulated Panels – Modular Homes with Structural Insulated Sandwich Panels
- Cheep Backyard Office with Sandwich Panels – Modular Homes with Structural Insulated Sandwich Panels
- Prefab Addition Results: What You Can Expect – Modular Homes with Structural Insulated Sandwich Panels