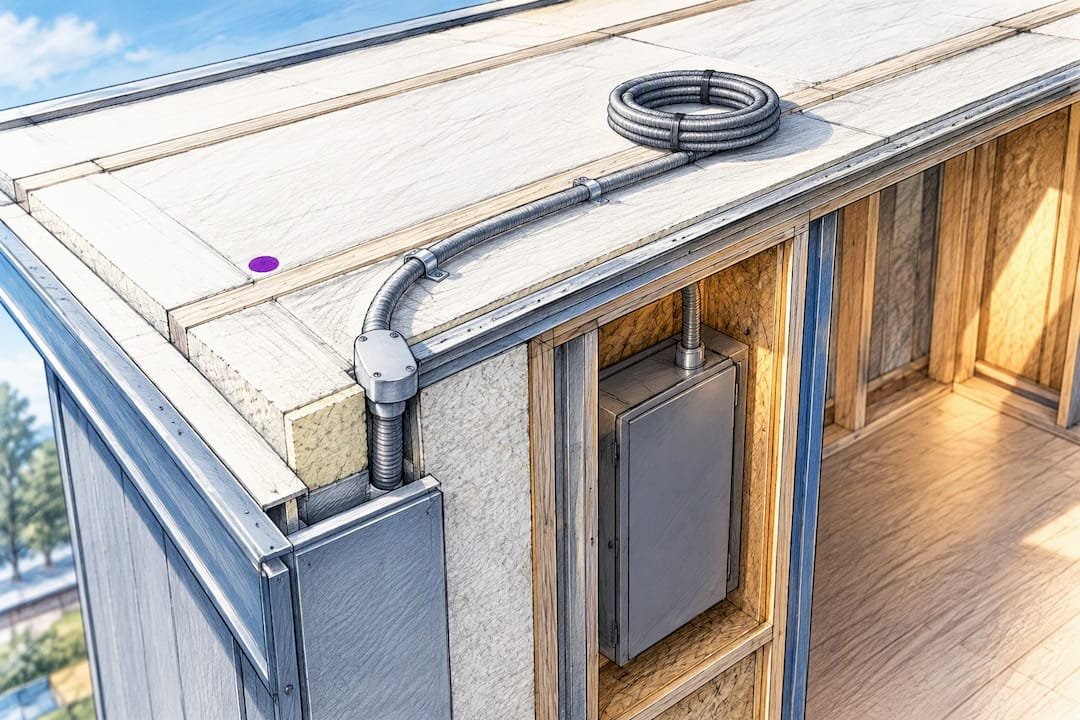
Yes, you can install solar on a modular SIP or sandwich-panel roof, but the installation depends on confirming facing material, panel thickness, and structural capacity before any mounting hardware goes on. The right first move is getting a structural engineer and your roof manufacturer to sign off on the mounting method before you order penetrating attachments or schedule an installer.
TL;DR:
- Confirm the roof panel facing, thickness, and static load capacity before installing solar hardware to prevent costly retrofits and roof damage.
- Mounting options vary by roof type, with clamps, screws, ballast, and BIPV each suited to different panel faces and structural conditions; site-specific calculations are essential.
- Structural and warranty approval should be obtained upfront, including sealing and fastener placement, to ensure safety, maintain warranty coverage, and prevent leaks.
- Electrical planning must reserve sufficient busbar and breaker capacity, with conduit routing and inverter placement handled during construction for easier future additions.
- Planning for solar during kit selection, with documented provisions, significantly reduces costs and improves system performance compared to retrofitting after installation completion.
Table of Contents
- Solar-readiness checklist: pre-install checks to run on your modular roof
- Mounting options for sandwich-panel roofs: clamps, screws, ballast, and BIPV
- Structural, warranty, and fire-safety matters to handle up front
- Electrical integration basics: panel sizing, inverter placement, and code items to reserve
- Specify solar-ready features in your prefab kit to save time and money later
- Installation steps and coordination: an on-site checklist for installers and homeowners
- Energy storage options and battery integration specific to modular homes
- Cost analysis and return on investment for solar on modular homes
- Maintenance and troubleshooting unique to solar installations on modular constructions
- Benefits and limitations of solar for modular homes compared to traditional homes
- Author perspective: why early planning matters
- How Prefab Modular Homes helps: request solar-ready kits and documentation
- Sources
- FAQ
Solar-readiness checklist: pre-install checks to run on your modular roof
Before any hardware touches your roof, run through a short list of checks that separates a smooth PV install from an expensive retrofit. Planning for conduit, roof type, and electrical infrastructure during construction minimizes installation costs and helps the system perform as expected, according to the solar-ready buildings planning guide. That planning window is largest before your kit ships, not after.
- Confirm the upper-facing material and thickness of your roof panels, then request the supplier’s spec sheet and layout drawing.
- Get a static load calculation covering wind, snow, and any ballast weight your mounting method adds.
- Review warranty language on penetrations and clamps, and ask about factory pre-installed mounts.
- Reserve breaker panel and inverter space, and pre-run conduit while walls and roof are still open.
- Map the roof-field layout early so panels avoid seam locks and drainage paths stay clear.
Roof type and roof warranty terms affect both install cost and safety, and flat membrane roofs or standing seam profiles are often the easiest starting points for future PV, per the same solar-ready planning guide. Sandwich-panel roofs need their own version of this same logic applied to facing metal and core material instead of membrane type.
Mounting options for sandwich-panel roofs: clamps, screws, ballast, and BIPV
Sandwich and SIP roofs are not steel decking, so mounting choices matter more than they would on a conventional truss roof. Four approaches cover most modular installs, each with a different balance of cost, roof impact, and long-term risk.
- Trapezoid clamps with EPDM or butyl gaskets grip the raised profile of trapezoidal steel facing without piercing it. Place them on the crown of the profile, never over a panel lock seam, since perforating the lock is what leads to leaks and core degradation over time, according to mounting guidance for sandwich roofs.
- Self-drilling screws with rail attachment work when the facing is thick enough to hold torque reliably; thinner facings risk stripped threads and water ingress, so match fastener choice to the facing gauge your supplier documents.
- Ballasted, elevated racks skip penetrations entirely on flat SIP roofs, trading roof damage risk for added dead load. That extra weight is significant enough that the roof structure needs to have been sized for it from the start, and ballasted systems also complicate any future roof resurfacing, per Department of Energy life-cycle guidance.
- Building-integrated PV (BIPV) replaces part of the roof surface with the panel itself, which sidesteps mounting hardware but still faces cost and availability barriers. Rack mounting remains the more common and proven route for most modular projects, according to Department of Energy design basics.
Pro Tip: Ask your mounting-system supplier for a site-specific static calculation and a documented tightening torque before installation day, not after.
Structural, warranty, and fire-safety matters to handle up front
A modular roof’s static capacity is not automatically the same as a conventional roof’s, and skipping the calculation step is where most retrofit problems start. Static calculations are required for corrugated and sandwich roof mounting, and fasteners need to stay clear of panel lock zones to preserve roof tightness, per mounting-system documentation for sandwich roofs.
- Have an engineer confirm edge and corner reinforcement before adding concentrated point loads from clamps or standoffs.
- Use flashed standoffs and proper sealing at every penetration to prevent leaks and interior condensation.
- Avoid drilling directly into panel locks, since that is the most common source of long-term water intrusion.
- Keep written sign-off from both the roof manufacturer and the structural engineer on file to preserve your roof warranty.
PV-related fire risk on a roof depends more on the insulation core’s combustibility and the array’s layout than on the solar panels themselves, according to fire-safety guidance for building-applied PV. Roofs with combustible cores such as EPS need a tested noncombustible mitigation layer rather than relying on module selection alone, and array spacing and gap height both affect how a fire could spread across the roof field.
Electrical integration basics: panel sizing, inverter placement, and code items to reserve
Your electrical plan matters as much as your roof plan, and it is far cheaper to handle both at the same time. The National Electrical Code caps the combined rating of overcurrent devices feeding a busbar at 120% of that busbar’s rating, so your main panel needs headroom reserved for a PV breaker before the array ever gets specified, per the solar-ready planning guide.
- Check your busbar rating against the 120% rule and reserve physical breaker space at the panel now.
- Site the inverter somewhere weather-protected and ventilated, and keep any battery in a NEMA-rated enclosure away from direct sun and moisture.
- Choose string inverters for a simple, unshaded roof, or module-level microinverters when partial shading or mixed tilt angles cut into performance, since Department of Energy design basics note that microinverters often perform better under those conditions.
- Confirm metering, disconnect, and rapid-shutdown requirements with your utility and local authority before installation, not during it.
Pro Tip: Request a load calculation from your electrician that accounts for the PV breaker before your kit’s main panel is finalized, so you never have to upsize it later.
Specify solar-ready features in your prefab kit to save time and money later
The cheapest time to plan for solar is when you are still choosing your kit, not after the roof is closed in. Ask your supplier for pre-cut chase locations and conduit runs that avoid panel lock zones, along with a roof layout drawing marked for future mounting fields. Request documentation on panel-facing thickness and material so your installer can pick fasteners correctly on the first attempt, and confirm the structure has been checked against your planned PV array weight.
Reserve a physical space near the main panel for an inverter or electrical cabinet, and ask whether the main panel can be upgraded at order time rather than swapped out later. Prefab Modular Homes offers insulated roof panels and can include solar-ready provisions such as reserved conduit routing and layout drawings when you specify them at the time of purchase, rather than after delivery.
Installation steps and coordination: an on-site checklist for installers and homeowners
A predictable sequence keeps a modular PV install on schedule: structural sign-off, then roof and waterproofing detail verification, then electrical panel and inverter planning, then permit filing, then installation and commissioning.
- Get structural sign-off on the mounting method and expected array weight.
- Verify roof waterproofing and flashing details match the manufacturer’s approved methods.
- Finalize electrical panel, breaker, and inverter placement.
- File permits and confirm utility interconnection requirements.
- Schedule installation and commissioning once every approval is in hand.
Before hiring a contractor, ask about their experience with sandwich-panel roofs specifically, request their mounting-system static calculations, and confirm how they handle warranty claims if a leak develops later. For permitting details specific to modular builds, see this modular home permits guide.
Energy storage options and battery integration specific to modular homes
Battery placement on a modular home follows the same enclosure and clearance logic as the inverter, just with more weight and heat to manage. A NEMA-rated enclosure keeps a battery out of direct weather exposure, and locating it in a conditioned or semi-conditioned space extends its working life far more reliably than an exterior wall mount exposed to full sun.
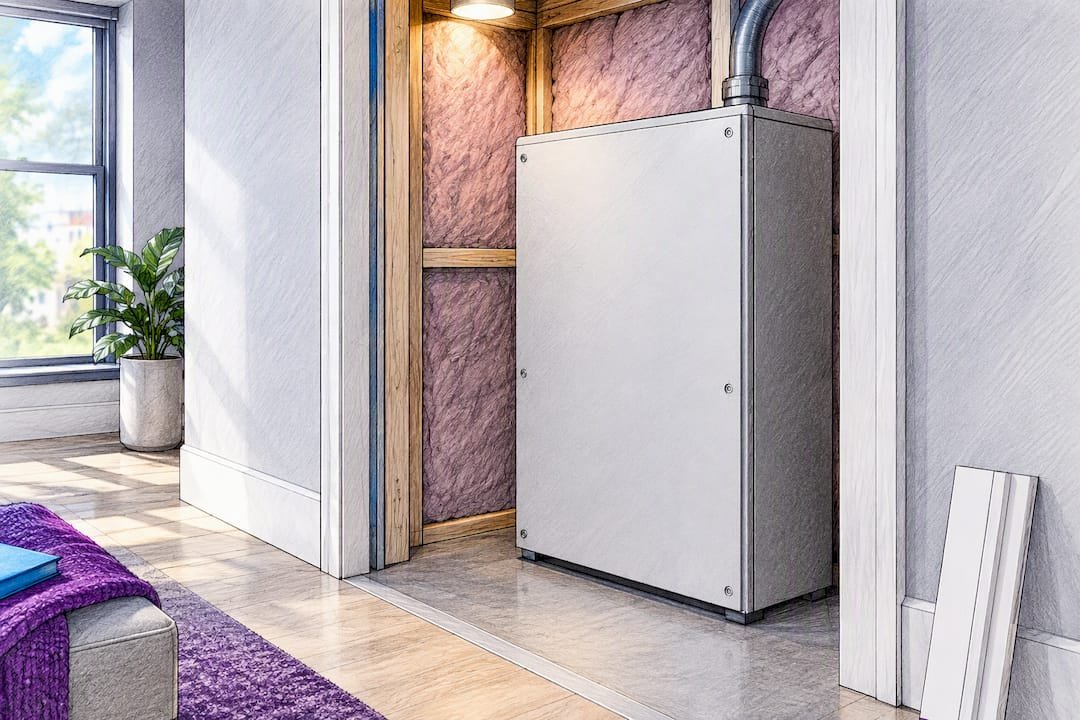
Modular kits often have less spare wall and floor area than a conventional house, so the storage footprint needs to be planned alongside the roof and electrical work rather than squeezed in afterward. A dedicated equipment nook near the main panel, sized during kit ordering, avoids the awkward retrofits that come with adding a battery to a home that never budgeted the space.
Sizing the battery to household load, rather than to array size alone, keeps the system balanced. Readers estimating how much capacity to pair with a given array size can find practical sizing methodology in this guide to sizing home solar systems, which walks through matching system output to actual household consumption. If you are planning an off-grid setup with battery backup, the provisions differ enough from a grid-tied system that it is worth reviewing separately, as covered in this off-grid prefab cabin guide.
Cost analysis and return on investment for solar on modular homes
The single biggest cost lever on a modular PV project is timing. Planning for conduit, roof type, and electrical infrastructure during construction minimizes installation costs and can be what makes a future PV system technically and economically feasible at all, according to the solar-ready buildings planning guide. Adding those same provisions after the roof and walls are closed up means cutting into finished surfaces, rerouting conduit, and sometimes upsizing an electrical panel that was never built with headroom.
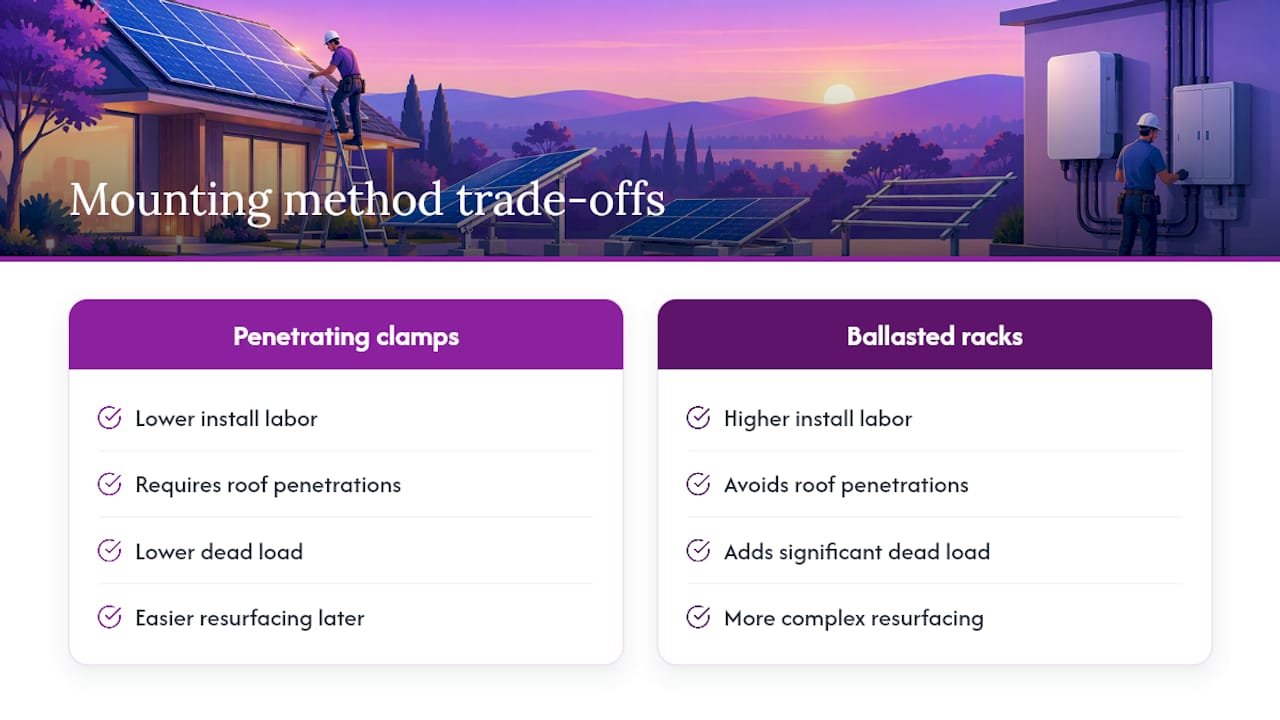
Mounting method also shapes cost. Penetrating clamp systems are usually cheaper to install than ballasted racks, but ballasted systems avoid roof penetrations at the cost of added dead load and, later, more complicated roof resurfacing, per Department of Energy life-cycle guidance. Choosing between them is really a choice about which cost you would rather carry: install labor now or structural and resurfacing complexity later.
Return on a modular PV system depends on local utility rates, incentive programs, and system size, all of which vary too much by location and household load to generalize into a single payback figure. What does hold across projects is that a solar-ready roof and panel, specified at the time of kit purchase, avoids the retrofit premium that comes from opening up finished construction. That premium, not the panels themselves, is usually what pushes a late-added system’s cost higher than one planned from the start.
Maintenance and troubleshooting unique to solar installations on modular constructions
Modular roofs introduce a few maintenance considerations that a conventional shingle roof does not. Every penetration, whether from a clamp bolt or a standoff, is a potential leak point, so an annual check of flashing and sealant condition matters more here than on a standing seam roof designed with fewer roof-mounted attachments in mind.
Watch for condensation at mounting points, especially where a fastener passes through the insulated core rather than just the facing metal. If a leak does appear, trace it back to the nearest penetration first, since panel lock seams are the most common failure point when fasteners were placed too close to them, according to sandwich-roof mounting guidance.
Ballasted systems need a different kind of check: periodic verification that ballast weight has not shifted and that roof drainage still flows freely around the rack base. String inverters and microinverters each have their own failure signatures, a string inverter fault usually shows as a drop across the whole array, while a microinverter fault tends to show up as an underperforming single panel, which makes troubleshooting faster once you know which system you have installed.
Keep your structural sign-off, mounting static calculations, and manufacturer approval documents together in one file. When a warranty question or a future roof repair comes up, that paperwork is what determines whether the work is covered or treated as an unauthorized modification.
Benefits and limitations of solar for modular homes compared to traditional homes
Modular construction has one real advantage over a traditional stick-built retrofit: the roof and electrical rough-in are still open during the planning window, so solar-ready provisions cost far less to add than they would after a home is finished and occupied. A conduit run or a reserved panel slot is a five-minute addition during kit assembly and a wall-opening job afterward.
The limitation runs the other direction. Sandwich-panel facings and cores are not all rated the same way for fastener pull-through or point loads, so a mounting method that works fine on a standing seam metal roof can be the wrong choice on a thin-gauge sandwich panel without verified facing thickness. Traditional roofs, particularly asphalt shingle and standing seam, have decades of mounting-hardware precedent behind them; modular sandwich-panel roofs have less of that shared track record, which is exactly why manufacturer sign-off and static calculations matter more here than on a conventional roof.
Ballast-based systems that skip penetrations entirely tend to suit flat SIP roofs better than pitched sandwich-panel roofs, where clamp or rail systems are usually the more practical fit. Neither roof type is categorically better for solar. The real difference is how much documentation and structural verification each one demands before installation, and modular roofs simply demand more of it up front.
Author perspective: why early planning matters
The pattern I see over and over is buyers treating solar as a decision for later, after the kit ships and the roof is closed. Coordinating structural, electrical, and manufacturer sign-off before assembly is what preserves your roof warranty and keeps retrofit costs down. It also tends to produce a better-performing system, since the roof layout and conduit paths get planned around the array instead of around whatever gaps are left over. Ask for solar-ready documentation when you order your kit, not after it arrives.
— Kian
How Prefab Modular Homes helps: request solar-ready kits and documentation
If you are speccing a kit now, this is the moment to ask for solar-ready provisions rather than retrofitting later. Prefab Modular Homes’ insulated roof panels come with facing and thickness documentation you can hand straight to a structural engineer or installer.

- Review roof panel specs and thermal performance details before you finalize mounting plans.
- Browse the full product lineup, including DIY kit homes, kit rooms, and container units, to see which base structure fits your solar plans.
- Request conduit routing and reserved electrical cabinet space when you place your order, not after delivery.
Check the products page to start specifying a solar-ready kit today.
Sources
- Solar Ready Buildings Planning Guide
- Life Cycle of Photovoltaic Systems: Install and Commission a Photovoltaic System | Department of Energy
- Mounting instruction corrugated sandwich roof | novotegra (mounting instructions PDF)
- Fire Safety Guideline for Building Applied Photovoltaic Systems on Flat Roofs
FAQ
Can modular homes use solar energy safely?
Yes, modular homes built with SIP or sandwich panels can carry solar arrays safely once the facing material, panel thickness, and structural load capacity are confirmed. Mounting method needs to match the roof’s static calculation, and a structural engineer or roof manufacturer should sign off before installation, per solar-ready planning guidance.
What mounting method works best on a sandwich-panel roof?
The right method depends on the roof: trapezoid clamps with gaskets suit corrugated steel facings, self-drilling screws with rails work when facing thickness supports them, and ballasted racks avoid penetrations on flat SIP roofs entirely. All three require a site-specific static calculation, according to mounting-system documentation.
Does adding solar affect a modular roof’s fire safety?
Insulation core material matters more than the panels themselves. Roofs with combustible cores such as EPS need a tested noncombustible mitigation layer, and array spacing affects how fire could spread across the roof field, per fire-safety guidance for rooftop PV.
How do I avoid voiding my roof warranty when adding solar?
Get written approval from your roof manufacturer and a structural engineer before mounting anything, and keep fasteners away from panel lock seams. Documented static calculations and manufacturer sign-off are what most warranty terms require to keep coverage intact.
What electrical capacity should I reserve for future solar?
Check your main panel’s busbar rating against the National Electrical Code’s 120% rule and reserve physical breaker space before your kit’s electrical rough-in is finished. Planning conduit runs and inverter placement during construction, rather than after, keeps later installation simpler and cheaper, according to the solar-ready buildings guide.